Cellphone as webcam

SmartCam - Smart Phone Web Camera - Turns a Symbian Series 60 phone with bluetooth and camera into a handy webcam ready to use with your PC

SmartCam is an open-source application that runs on Windows XP or Vista, enabling any S60-powered handset's camera to double up as a webcam.

Before you get started though, remember to install the SmartCam application onto your Windows machine followed by the mobile client on the S60 device

for Help visit: http://sourceforge.net/forum/?group_id=197856

Download

Leave a comment if u like....................

Delete without confirmation

Whenever We delete any thing , prompt comes up asking R U sure.This becomes irritating to delete same thing again.Here R 2 ways through which U can delete a file at the first time itself.

Method 1:
1. Right-click on the 'Recycle Bin' on the desktop and then click 'Properties'
2. Clear the 'Display Delete Confirmation Dialog' check box and click 'Ok'
If you do accidentally delete a file don't worry as all is not lost. Just go to your Recycle Bin and 'Restore' the file.

Method 2:

If you want to permanently delete an item than just press shift & delete button .it will permanently delete that file.

Hope u like it.Do leave a comment............

Change your login screen

NOTE: I WILL NOT BE HELD RESPONSIBLE FOR ANYTHING RELATED TO THIS TUTORIAL THAT CAUSES ANY ERRORS ON YOUR COMPUTER.

With that out of the way, let’s get on with it.

I was tired of my default windows xp login screen, and thought it would be cool to make my own. So I did, and now I’m writing a tutorial about how you can do it.

Part I: The Bitmaps

1. First, go to your Windows\system32 folder and COPY your logonui.exe file to another directory. (I suggest your My Documents folder.)

NOTE: MAKE SURE YOU COPY THE FILE, NOT MOVE IT. YOU MIGHT ALSO WANT TO BACK UP YOUR OLD ONE, BUT YOU DON’T HAVE TO.

2. Download ResourceHacker and unzip it to the desired location.

3. Open ResHacker and open (File > Open) the copy of the logonui.exe (not the original)

4. Let’s start with the Bitmaps. Here’s a run-down of what’s what.

-100: Background of the Login screen. Make sure you remember what the resolution of your image is, we’ll need it.

-102: Password Box. You might want to change the border color if you have a solid background

The Rest really don’t concern us, but you’ll see what they are if you view them.

5. Right, let’s get to work. Go to Action > Replace Bitmap. Click on 100, then go over and click on “Open file with new bitmap.” Go to the bitmap file of the background image you want, and click Open. Then click Replace.

Now we should have the new background image. Do the same procedures on any other images you want to replace, and then move on.

Part II: The UIFILE

Now we get to change some code to move some stuff around on the screen.

1. Close the Bitmap folder and expand the UIFILE folder, then the 1000 folder, and then click on 1033.

2. You should see a whole lot of script. Pretty much all we want to do here is possibly move the User Account List if it conflicts with your image.

3. You should see some code like this:

<element id=atom(contentcontainer0) layout=flowlayout(1,3,2,3) layoutpos=client content=argb(0,0,0,0)>
<element id=atom(leftpanel) sheet=styleref(leftpanelss) layoutpos=left>
</element>

That will align the user account list to the left. To move it to the right, replace it with this:

<element id=atom(contentcontainer0) layout=flowlayout(1,3,2,3) layoutpos=client content=argb(0,0,0,0)>
<element id=atom(rightpanel) sheet=styleref(rightpanelss) layout=borderlayout() layoutpos=left width=384rp>
</element>

4. Now click “Compile Script” and move on to the third section.

Part III: The Version Info

This will let you add your own tag to the login. Go to the Version Info Folder, then 1, then 1033.

The rest is pretty self explanitory.

Part IV: Installing

First, go to File > Save as… then go to the directory you want to save it to (Not your system32 folder yet). Type your filename, and make sure you put .exe on the end to make it the right type of file.

Now, you have one of two choices:

1: Boot into safe mode and overwrite the logonui.exe file in system32, or

2: Get a program like StyleXP.

Hope this tutorial helped you.

Here’s what I made using this technique:

Source:http://theonegreatx.com/?p=10

Auto kill not responding programs

There are many instances when u would have faced the problem with Program not Responding message.There is an easy way to get rid of this problem.But,before doing this,firstly

Backup your registry first.
Go to Run and enter “Regedit“.
Browse to HKEY_CURRENT_USER\Control Panel\Desktop


Here you will find a string called as “Auto End Task“, set its value to “1” by double clicking it. This means any hung program will be killed instantaneously.
Now suppose if you want to give some time, as some programs come back to normal in few minutes, Find a key called as “WaitToKillAppTimeout“, change the value to the value you want. You have to enter value in milliseconds.

Hope u like it....

Download Faster with DAP 8.7

Many of us want to download many important things like softwares, ebooks or some documents but due to slow download speed,it takes days if not weeks to download.With this Downlaod manager, u can download much faster.        

"Download Accelerator Plus (DAP)--the popular download manager with over 160 million users worldwide. DAP leverages patented technology, easy management of downloads and rich features and includes an upgraded download window for faster downloads with ease and simplicity, improved management window, ability to upload and send large files, the SpeedBit Video Accelerator expansions. Available in 10 languages."

DAP

Version 8.7.0.5 adds support for Google Chrome, upgrades the download window, and improves the management window.

Download Here

1)Mirror

2)Mirror

Download WMP 11

From today's onward,I am starting a section on softwares.Those softwares will be provided that have proved their worth downloading.Stay tuned.Many softwares will be provided with many mirrors.Starting with Windows Media Player 11.

Windows Media Player 11 (24.56MB)
Publisher's description of Windows Media Player
From Microsoft:

Windows Media Player 11 for Windows XP offers great new ways to store and enjoy all your music, video, pictures, and recorded TV. Play it, view it, and sync it to a portable device for enjoying on the go or even share with devices around your home all from one place.


Simplicity In Design: Bring a whole new look to your digital entertainment. More of the Music You Love: Breathe new life into your digital music experience. All Your Entertainment in One Place: Store and enjoy all of your music, video, pictures, and recorded TV. Enjoy Everywhere: Stay connected with your music, video, and pictures no matter where you are.
Download from any one
1)Mirror
2)Mirror

Any suggestions,do post it.Thanks!

Rescue disk to clean virus without booting windows

Some virus are very destructive or badly coded until it affects Windows stability. One of the worst thing that could happen is you’re unable to boot in to Windows and not even Safe Mode. That makes it harder for tech people to troubleshoot the problem and ended up in reformatting the hard drive to reinstall Windows. Last year I written a guide on how to clean or remove virus when you can’t boot in to Windows using Hiren’s BootCD.

However, Hiren’s BootCD only has F-Prot and McAfee dos based antivirus, which I personally think that it is not strong or smart enough to detect and remove some viruses. The only antivirus program that I can put my trust on is Kaspersky.

Good news is Kaspersky has started offering Rescue Disk to scan and remove virus on computer without the need of booting in to Windows.

Download the ISO disk from here

http://dnl-eu10.kaspersky-labs.com/devbuilds/RescueDisk/

Install Windows XP from Pen drive

First of all, I m sorry. I have not been regular with my posting But from now onwards I will make sure that I m regular with posting. Now,coming to the topic,U might be tempted to these because of many factors like to satisfy the geek inside u,Ur CD Drive is not working,to learn due to curiosity & soon.........Here is a tutorial written by someone.He can be contacted from his orkut profile.

Here r the steps:

*Make image file of win XP & copy it into ur pen drive & connect to the system.(Steps to make image of image file from the XP CD r mentioned in the end)

*Restart ur PC

* Press Del to go to bios setting.(My system uses del to enter into bios,check ur pc,if it doesn't than press F2)

*Change the boot order & select USb as ur 1st boot device & save it by pressing F10.And,finally restart ur PC.

How to make image file

first of all download the following free tools: hp usb stick format utility,nlite, barts pebuilder.

now follow the steps:-

Formatting the USB flash drive Firstly, try to format the USB fl ash drive using the FAT 16 fi le system as most BIOS generally accept this particular format as a bootable medium. Surprisingly, the onboard Windows formatting tool did not work for us. So, we opted to use the “USB Disk Storage Format Tool” from HP instead. After starting up the program, choose the USB fl ash drive to be formatted and select “FAT” located under “File System”. Enter a name of less than 11 characters for “Volume Label” and click on “Start” to begin formatting. After the process is completed, open Windows Explorer and navigate to the root directory on which Windows is located - usually, “C:\”. Copy the “boot.ini”, “ntdlr” and “NTDETECT.COM” fi les from the directory to the USB fl ash drive. If you can’t locate the above mentioned fi les, try deactivating the “Hide protected operating system fi les” option found under “Tools| Folder Options| View” of Windows Explorer. Next, select “Show hidden files and folders” option as well. You should be able to see the fi les now. Copy them to the formatted USB fl ash drive.
----------------------------------
Copying Windows to the USB flash drive
The next process is divided into four stages. Firstly, you need to free Windows of any excess baggage. Secondly, prepare third-party utilities, then create a self starting copy of Windows and fi naly, copy all of these to the USB fl ash drive

STEP 2. Standardizing Windows
To produce an optimal copy of Windows XP complete with service packs, hotfi xes and drivers, you can use a freeware called “NLite”. Note that NLite requires access to Microsoft . NET’s library, which needs to be installed on your system. This and Service Pack 2 are available on the Microsoft web site. The Service Pack and hotfi xes need not be installed as NLite will only integrate the necessary setup fi les. Remember to install the .NET-Framework before NLite. Before running NLite, create a folder named “XP” on your desktop. Insert your Windows setup CD into the DVD/CDROM drive and copy the whole CD into the new folder. Any changes made from now are done to the newly copied fi les in the XP folder. Do not meddle with the existing installed copy of Windows on your hard drive. Run NLite and select the “XP” folder as the root directory. Click on “Next” after the program completes reading the folder until you reach “Task Selection”. Activate options for integrating SP and hotfi xes as well as “Erase components”, “Patches” and “Tweaks”. With the help of the NLite wizard, you should aim to create an optimal streamlined copy of Windows. To minimize total fi le size and shed excess baggage, remove any entries highlighted by NLite as safe for deletion. Visit www. msfn. org (MSFN Forums - Member Contributed Projects - nLite) to get more information on the latest confi guration manuals and other useful tips on this program. Also, If you prefer to use an alternative browser such as Firefox, you may discard the Internet Explorer option but do include the “Internet Explorer Core” option so that useful features such as Windows Update can still function..

STEP 3. Preparing utility tools
The next step involves preparation of installation fi les for each utility tool to be included into the USB fl ash drive. If you want to include Firefox, do not use the full setup fi le from Mozilla’s web site. Instead, use the “Mozilla Firefox Plug-In” customized for “Bart’s PE” (available from http://oss.netfarm.it/ winpe). Besides Firefox, you might want to include other software such as Ad-Aware, Nero Burning ROM and Avert Stinger anti-virus scanner. Any other software you deem necessary can be included but do take into account the space limitation of your fl ash drive. As NLite only creates a copy of Windows that contains setup fi les and not the installed version, we will not be able to copy the entire “XP” folder nto the USB drive. To create a bootable Windows XP, we need to make use of the “Bart’s PE” tool found at www.nu2.nu. after installing “Bart’s PE”, run “PE Builder” and insert “XP” as “Source”. When referring to this article, just use the default directory name provided (C:\PEBuilder319\BartPE, depending on your version of PE Builder) located under the “Output” section for convenience. Next, click on “PlugIns”. If you follow our recommendations, choose to activate the plug-ins for Nero, Ad-Aware and Avert Stinger. If any of your desired tools are not displayed, visit www.nu2.nu/pebuilder/ #plugins to download the necessary plugins and extract the fi le into the plug-in folder of Bart’s PE. Every plugin contains a readme fi le that describes its installation.

STEP 4. Integrating safety tools
For each tool that was marked for inclusion, there would be a specifi c folder respectively found under Bart’s PE installation directory. All the necessary fi les should be copied here. This way, the selected tools will be installed with Windows. Let’s start with the Firefox browser. All we need to do is extract the downloaded plug-in into the “C:\PEBuilder319\plugin” folder. You don’t have to make any changes as the plug-in is already optimized for integration to Bart’s PE. Next, proceed to install Nero Burning ROM. Copy all the fi les from the Nero directory to the “nero burning rom” plug-in folder. In that folder, you will notice a fi le called “penero.inf”. Open it with a Windows text editor (e.g. Notepad). For Nero Burning ROM version 6, discard the semicolon (;) in front of [Software.AddReg] and for the three lines below. Edit in your username, company name and Nero serial number before saving, and closing the file.

Making Windows bootable
Up to this point, all preparations are ready. Ensure that the USB fl ash drive is plugged in and delete any fi le copied for the first test. Next, run PE Builder and make sure that “XP” is selected as “Source”. Deactivate the “Create ISOimage”and “Burn to CD/DVD” option. Click on “Build” so that Windows is created as a self-starter.

REMEMBER UR WINDOWS XP SHOULD BE A SERVICE PACK 2 ONE.
Copying files to USB Flash Drive
With the help of a batch file, you will now
be able to copy Windows to a USB fl ash drive. Point Windows Explorer to the folder “C:\PEBuilder319\plugin\peinst” and run the fi le called “peinst”. In the opened DOS screen, select button [1] and change the source-path to “C:\ PEBuilder319\bartpe”. Next select button [2] and enter the letter in which the USB fl ash drive is located as your target path. Moving on, choose button [5] to install Bart’s PE and start through button [1]. Bart’s PE will now transfer all relevant data into your USB fl ash drive. When the “Installation completed” message shows, your USB version of Windows is ready for use. To test it, boot your PC with the USB flash drive. The USB version of Windows will look slightly different when compared
to the standard Windows XP.

All credit goes for this article goes to it's writer.

Hidden XP Programs.

There r few hidden programs that r not know to general public.Here they r,

Programs :

1. Private Character Editor :

Used for editing fonts,etc.
** start>>Run
** Now, type eudcedit

2. Dr. Watson :

This an inbuilt windows repairing software !
** start>>Run
** Now, type drwtsn32

3. Media Player 5.1 :

Even if you upgrade your Media Player, you can still access your old player in case the new one fails !!!
** start>>Run
** Now, type mplay32

4. iExpress :

Used to create SetupsYou can create your own installers !
** start>>Run
** Now, type iexpress

Here's a hidden program in Windows Xp, it is a very useful graphics tool for designing your own fonts, logos and icons.

Here's a hidden program in Windows Xp, it is a very useful graphics tool for designing your own fonts, logos and icons.

Start :
Run :
"EUDCEDIT"

pls leave comment as to how u like it.............if possible kindly go through ads.Maybe, i might learn something..........

increase your RAM

increase Memory by deleting unnecessary DLLs stored in memory.
click start,,, goto run then goto regedit,
now go to
HKEY_LOCAL_MACHINE\SOFTWARE\Microsoft\Windows\
CurrentVersion\Explorer.
right click on the explorer click New then Key,,, and then give it name (AlwaysUnloadDLL)
after restarting the computer,, you will see significant change in speed specially if your ram is less than 512mb

the following three registry tuning tips can be used for al windows PC's with ram of over 128mb
goto regedit as mentioned above,, then HKEY_LOCAL_MACHINE\SYSTEM\CurrentControlSet\Control\
SessionManager\MemoryManagement
now set the following values,
DisablePagingExecutive = 1
IOPageLockLimit
if ram is then value
128 4000
256 8000
512 and over 10000
LargeSystemCache=1
Note for changing the value u will will need to double click the files I mentioned from the right hand side windows

How To Disable Balloon Tips in Windows XP?

Here are two simple methods to get rid of annoying Windows XP balloon popup's :
# Registry Hack Method

1. Press Windows Key + R
2. Type regedit.exe and press enter.
3. Navigate to key - HKEY_CURRENT_USER\Software\Microsoft\Windows\CurrentVersion\Explorer\Advanced
4. right-Click and create a new DWORD value called EnableBalloonTips
5. Give it a decimal value of 0 (zero)
6. OK and Exit, Restart system and balloon tips should be gone.
# Group Policy Editor Method

1. Press Windows Key + R
2. Type GPEDIT.MSC and press enter.
3. Navigate to User Configuration -> Administrative Templates -> Start Menu & Taskbar
4. Double-click "Remove Balloon Tips on Start Menu Items" and choose Enabled.
5. OK and close GPEDIT.
6. Restart system and balloon tips should be gone.

See large image

Some Important Run commands

U might be knowing a little bit about some of the common command which are used at run dialog box.Here, I am listing some of the commands.just use in front of your friends to show your geek factor...

Here are some of the useful shortcut commands.
(Tip - You can directly open 'Run' by pressing Windows+R keys at a time.)
command - to run MS - DOS (.com, .pif)
calc - to run calculator (.exe)
control - to open Control Panel (.exe)
defrag - to defrag the hard disk drives (.exe)
dialer - for dialing setups (.exe)
explorer - to open Windows Explorer (.exe., .scf)
ftp - for File Transfer Protocol if internet is connected (.exe)
ms-dos~1/ms-dos~2 - for fully MS-DOS mode.
No Windows O.S. (.pif)net - for net information cum help (.exe)
ping - for bytes information and bandwidth of internet connection information (.exe)
regedit - to open Registry (.exe)

telnet - command runner if the system is conncected in a UNIX system network (.exe)
tuneup - for Task Scheduling wizard, i.e. Task Maintanance (.exe)
notepad - to run Notepad (.exe)
write - to run Wordpad (.exe)
scanregw - to scan the Registry and to backup it (.exe)
progman - to maintain, run and view the files in all drives (.exe)
directcc - to join your computer in cable conncetion with other computers (.exe)
scandskw - to open Scandisk to scan the hard drives (.exe)
winfile - Windows File Managertaskman - to manage current running open programs or files.Nice replacement for default Windows taskbar

msconfig - to maintain the configuration of computer. It will show the options like General, Startup including files Autoexec.bat, Config.sys, System.ini and Win.ini. (Autoexec.bat & Config.sys are MS-DOS files)

winrep - to run Windows Report Tool - Accessories>System Tools>System Information (.exe)winver - to know the version of Windowspackager - insert objects in documets, presentations or worksheets
clipbook - a simple utility that allws you to save and recall several pages or graphics. (.exe)sysedit - view or edit system files from within one window (.exe)

coments plzzzz.............

how to fix corrupted files in xp

Some of the system files becomes corrupt when we install certain application.U know that once system files become corrupt than it becomes really frustrating to repair your XP installation.Here is a quick & safe solution.This method will only work only if u r running the  machine i.e u have already logged into the system.If u some how get into safe mode also than this can be used.Place the Windows XP cd in your cd/dvd drive
Go to start
then run
type in 'sfc /scannow' (without the ')

Now it should all load, and fix all your corrupted file on windows XP

There are a number of parameters that can be passed to sfc command.Go to cmd & type 'sfc' without single quotes & u get something similar as shown above....

use your pendrives as RAM

Many of u might be thinking that I am telling lie & those, who r using vista might be thinking that this feature is confined to vista.But, truth is something different.This software is not free if u purchase vista than u get Microsoft ready boost software free but there is 3rd party software for XP.It is eboostr.Here is the screenshot

eBoostr™ is an alternative solution to Vista’s ReadyBoost and SuperFetch technologies now available on Windows XP

It speeds up your PC and improves application responsiveness by using flash memory and free RAM as an extra layer of performance-boosting cache for your PC. Use up to four inexpensive flash devices to speed up your system. Add more speed to your PC without any hardware upgrade!Note:U will download trial version which can be used for: 4-hours for trial.

remove regserv.exe

Its a spyware.There are 2 methods available to sort out this issue

Method 1

Download SpyHunter's Spyware Scanner.It automatically detects it & removes it

Download

Method 2

This is a manual method .It is bit difficult and if not used properly,u might face certain problem.

Step 1: Use Windows File Search Tool to Find regserv.exe Path

Go to Start > Search > All Files or Folders.
In the "All or part of the the file name" section, type in " regserv.exe" file name(s).
To get better results, select "Look in: Local Hard Drives" or "Look in: My Computer" and then click "Search" button.
When Windows finishes your search, hover over the "In Folder" of " regserv.exe", highlight the file and copy/paste the path into the address bar. Save the file's path on your clipboard because you'll need the file path to delete regserv.exe in the following manual removal steps.

Step 2: Use Windows Task Manager to Remove regserv.exe Processes

To open the Windows Task Manager, use the combination of CTRL+ALT+DEL or CTRL+SHIFT+ESC.
Click on the "Image Name" button to search for " regserv.exe" process by name.
Select the " regserv.exe" process and click on the "End Process" button to kill it.

Step 3: Detect and Delete Other regserv.exe Files
To open the Windows Command Prompt, go to Start > Run > cmd and then press the "OK" button.
Type in "dir /A name_of_the_folder" (for example, C:\Spyware-folder), which will display the folder's content even the hidden files.
To change directory, type in "cd name_of_the_folder".
Once you have the file you're looking for type in del "name_of_the_file".
To delete a file in folder, type in "del name_of_the_file".
To delete the entire folder, type in "rmdir /S name_of_the_folder".
Select the " regserv.exe" process and click on the "End Process" button to kill it.

source:http://www.spywareremove.com

enable/disable USB drives

USB drives have become very common today>it has lot advantage but,there are certain problems associated with it.These devices are the common carrier of viruses & worms which can create havoc in the system.when ever any usb drive is connected to system,it is automatically detected.It is done through  usbstor.sys driver.It automatically loads appropriate driver for the USB drive..our motto is stop this driver.

so, here is a way to stop USB device from getting detected.

This method is targeted towards enabling and disabling USB pen drives.(Has no effect on USB mouse or keyboard).

To block the to use of USB Removable Disks follow these steps:

  1. Open Registry Editor.

  2. In Registry Editor, navigate to the following registry key:

HKEY_LOCAL_MACHINE\SYSTEM\CurrentControlSet\Services\USBSTOR

  1. Locate the following value (DWORD): Start and give it a value of 4.

To enable USB pen drives,change the value from 4 to 3.Here is the figure for the same.

Note:If u don't find USBSTOR in your registry than USBSTOR.sys is not installed in your system.To install it just connect a pen drive to the system.XP will automatically install it.

Have any more problem?mention it.we will solve it.

how to delete commands from run box

U might be wondering what is the need for doing this.This is needed because there are certain hidden commands in XP which are known to admin & he/she don't want its user to use those commands.

Goto start->settings->Taskbar & start menu(click it)
In Taskbar & start menu properties,go to start menu tab.There u will get customize button as shown in figure

click it and u will be presented with another window popup.press the clear button.Now all the commands that u have entered in run will be deleted. It will also delete list of all the files that the user has opened.

What i suggest u is try using ccleaner.It will automatically remove those entries,also it will increase your system performance.

Download Google Chrome Offline Standalone Installer

By now, u must be familiar with google chrome.but,are unable to install it offline.I am providing you the direct link to download chrome browser.so,u don't have to download & install it online.This will be highly beneficial to those people who are using dial-up or limited account.I personally feel that online installer are very cumbersome to install.so,that's the reason to provide direct download from google server.

DOWNLOAD

Hide file(s) in jpg image

1. Gather all the files that you wish to hide in a folder anywhere in your PC (make it in C:\hidden - As an example).
2. Now, add those files in a RAR archive (e.g. test.rar). This file should also be in the same directory (C:\hidden).
3. Now, look for a simple JPEG picture file (e.g. horse.jpg). Copy/Paste that file also in C:\hidden.
4. Now, open Command Prompt (Go to Run and type ‘cmd‘). Make your working directory C:\hidden.
5. Now type: “COPY /b horse.jpg + test.rar result.jpg” (without quotes) - Now, horse.jpg is the picture you want to show, test.rar is the file to be hidden, and result.jpg is the file which contains both.
6. Now, after you have done this, you will see a file result.jpg in C:\hidden. Open it (double-click) and it will show the picture you wanted to show. Now try opening the same file with WinRAR, it will show the hidden archive .

Demo is shown

hoping u like it.stay tuned to my blog for more tech updates.

Auto delete TEMP folder

When er extract any file from winrar or any other compression software,a temporary file is created which is stored somewhere in Temp folder.Even , when we install anything, various temporary file is created.Over a period of time.U the size of this folder increases too much which in turn affects the performance of your PC.Various tools come which clean this folder when  run them.It it will be better to let windows automatically delete the content from this temp folder without installing any software.Lets start .........what i prefer is %temp% " without quotes.. go to Start -> Run..
this opens ur temp folder n den u cal erase it neatly// still try dis one too..

Screenshot of my temp folder

First go into gpedit.msc
Next select -> Computer Configuration/Administrative Templates/Windows Components/Terminal Services/Temporary Folder
Then right click "Do Not Delete Temp Folder Upon Exit"


Go to properties and hit disable. Now next time Windows puts a temp file in that folder it will automatically delete it when its done! If u like it,leave a comment..........

find product keys from local and remote computers

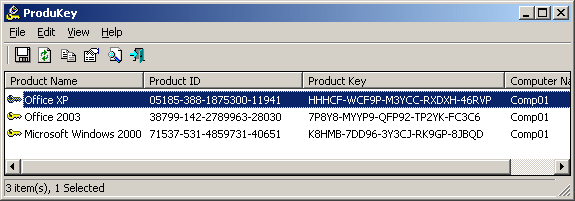
System administrators have to keep a record of all the product keys  of all the softwares that have been installed.But,this seems to easy task when u have to find for a single workstation.The real scenario is much different.Normally, administrators have to administer complete network.To find the keys of all the software which are installed.Here is a tool which can find keys from remote machine also.so, now administrators don't have to travel from one PC to another. ProduKey ,nrisoft product.Here is the screenshot.

click to Download.

System Requirements
ProduKey works on all 32-bit versions of Windows. However, some features, like viewing the product keys of another operating system instance, are only supported on Windows 2000/XP

for More information click here

create 'con' or 'nul' or 'prn' folder

This "con" word can be found on web which will tell u how to create it but there are more such names which u cannot use to create a folder or any file.These names are:

CON, AUX, COM1, COM2, COM3, COM4, LPT1, LPT2, LPT3, PRN, NUL

Its fun to create a folder with such name but it could even crash your system as these words are reserved for the system.When u try to save any file with name like con u, pop message will come like this.

Now coming to how to create a folder with those reserved keywords.Lets start with con folder.We can create a folder named CON or LPT or COM by a simple way.
Right click and do create folder process. While naming the folder, type 'CON' and type c55 in the numpad holding the alt button.
EX 'CON' + (hold atl + '255').

This process would create a folder named CON and a space with it. You cannot explicitly give a space because windows cuts off the excess spaces before or after the name.Other way to go about making a con folder :

Start->run->cmd(enter)Now type following command(first reach c:\ in the command prompt.U can reach here from c:\Documents and Settings\Administrator by typing cd.. & enter till u reach c:\ at command prompt)

type in prompt c:\> "mkdir \\.\c:\con"

verify by typing "dir \\.\e:\con"

After u create such folder,it cannot be deleted the say same way u delete other files from the windows.To delete the file or folder type "rmdir \\.\c:\con"

These are special keywords used in DOS.All the reserved words & their keyword descriptions
CON Keyboard and display
PRN System list device, usually a parallel port
AUX Auxiliary device, usually a serial port
CLOCK$ System real-time clock
NUL Bit-bucket device
A:-Z: Drive letters
COM1 First serial communications port
COM2 Second serial communications port
COM3 Third serial communications port
COM4 Fourth serial communications port
LPT1 First parallel printer port
LPT2 Second parallel printer port
LPT3 Third parallel printer port
These are called short file names. Short file names have the 8.3 format and are compatible with MS-DOS and other legacy operating systems. They allow the windows OS to communicate with DOS or basically give the OS the ability to access files on a volume. Playing with these file names and creating garbage folders like you all are trying to do may cause your system to crash.Now, its upto u to experiment.Generally,there may be no problem when u create such folder but after some time,ur system might........ Don't blame me if some goes wrong..........

Automatic Updates not working

To resolve the Automatic Updates problem (and to protect your computer against vulnerabilities) go to either the Windows Update or Microsoft Update web sites and install any needed Windows Service Packs or updates. Once you have downloaded and installed at least one critical update from the Windows Update or Microsoft Update web site, Automatic Updates will once again correctly detect, download or install Windows Service Packs or security updates depending on what settings you have selected for Automatic Updates on your computer.To chane the settings of windows automatic update.Press windows+pasuse/break" button together.A screen will be presented like this.

It might be the case that your setting might have been changed.Just check out............

switch identity in windows mail (vista)

Well, first of all, you can install all three accounts in the same instance
of WinMail.
Second, WinMail doesn't have identities.
Steve Cochran has written a program to fix that:
WMIDs http://www.oehelp.com/WMIDs/Default.aspx
Windows Mail does not have Identities. However, you can achieve
similar functionality with two minutes of work:


Create additional Inboxes such as Inbox1, Inbox2, Inbox3.
Then create 3 Message Rules:
1. Where the message is from the User1 account
move it to the Inbox1 folder
and stop processing more rules.
2. Where the message is from the User2 account
move it to the Inbox2 folder
and stop processing more rules.
3. Where the message is from the User3 account
move it to the Inbox3 folder
and stop processing more rules.
Hope that helps.

Shutdown your PC with single click

Many of us want this feature.reasons may vary.In my case, I m too lazy to click start->Turn of computer->Turn off.There is an alternate way to achieve it.Here,I will show u how?

Right click on your desktop.Select New->shortcut.A screen will open up like this.

Now type "shutdown -s -t 00" & click next & save it with a name..

similarly u can create a shortcut to abort a shutdown.Just type following line "shutdown -a" & save it.How do u like it...........

'Windows script host' pop up annoying

Here is the solution
* Right-click My Computer
* Select Open from the menu
* Select the View tab
* Select Options
* Open the File Types tab
* Select VBScript Script File from the list of file types
If its not there, then WSH is not installed or has been disabled. If its there
* Click on the Remove button to remove the ability of WSH to run .vbs scripts.
* Another alternative if you want to know when a script has been activated, you can use the Edit button to change the default action for .vbs files from Open (running) them to Edit . That is open script in Notepad.
# Dynamically disable / enable WSH using Symantec's Noscript.exe freeware program.
# Disable scripts using freeware AnalogX Script Defender program. AnalogX Script Defender will intercept any request to execute the most common scripting types used in virus attacks, such as Visual Basic Scripting (.VBS) and Java Script (.JS). It can even be configured to intercept new script extensions as needed! It's very simple to use and helps to ensure that you do not inadvertently run a script no matter what email program you use, or even if you get it via another method.

remove W32.Rungbu

W32.Rungbu infects Word document files with a copy of the virus.

Technical Name:W32.Rungbu

Threat Level:Low

Type:Virus

Systems Affected:Windows All

W32.Rungbu removal procedure requires technical know-how on  computer troubleshooting. It is better to consult your LAN Administrator or Technical Persons to avoid additional damage on your computer if modifications on Services and Registry have to be done.

MANUAL REMOVAL:

1. Temporarily disable System Restore (Windows Me/XP). [how to]
2. Update the virus definitions.

3. Restart the computer in SafeMode [how to]
4. Run a full system scan and delete all infected files.
5. In order to make sure that W32.Rungbu is completely eliminated from your computer, carry out a full scan of your computer using AntiVirus and Antispyware Software. Another way to delete the virus using various Antivirus Program without the need to install can be done with Online Virus Scanner.

More info:W32/Rungbu-A @ Sophos

Source: www.precisesecurity.com

Turn of autoplay in windows

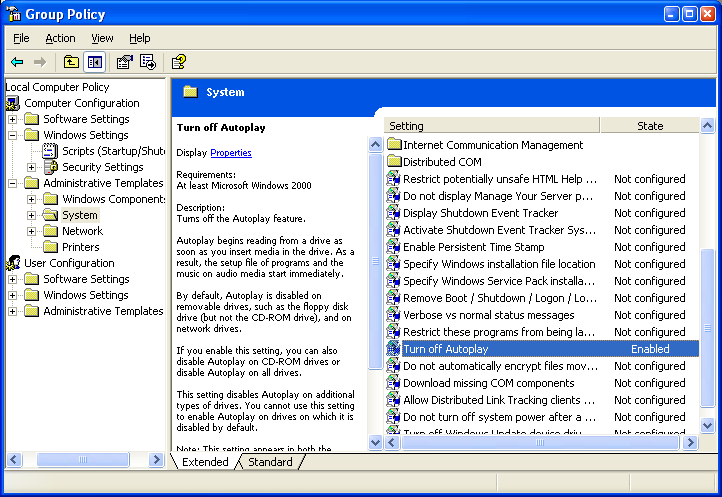
There  r many viruses which becomes if autoplay is enabled.This will execute the virus once u open any folder or any drive.It will automatically become active & will execute itself.so, autoplay feature must be disabled to protect ur system asthe sayong goes "Prevention is better than cure".Follow these steps start->run->gpedit.msc.Now, look at the figure shown

View large image at http://farm4.static.flickr.com/3147/2845718404_c6b592354c_o_d.png

Now, u just have to enable it.That's it.U ur system will become a bit more secure against those viruses, malwares which use autoplay feature to spread itself....

Hide "My Network Places"

we usually want to keep our desktop clean as much as possible.Possibly this is the major reason why we attempt to remove those things that are of no use to us.For home usesr, "My Network Places" icon is just taking place(if u have a single pc).So,here are steps to hide My Network Places from Desktop

Method 1

  • Open Registry Editor and navigate to:

HKEY_CLASSES_ROOT \ CLSID \ {208D2C60-3AEA-1069-A2D7-08002B30309D}
\ ShellFolder

  • Backup the key by exporting it to a REG file.

  • In the right-pane, create a new REG_DWORD value named Attributes

  • Double-click Attributes and set 20180000 as the Value data

If you want to undo the changes, delete the Attributes value.

Method 2
  • Start Regedit.exe and navigate to:

HKEY_LOCAL_MACHINE \ SOFTWARE \ Microsoft \ Windows \ CurrentVersion \ policies \ NonEnum

  • Create a new DWORD value named {208D2C60-3AEA-1069-A2D7-08002B30309D}
  • Double-click {208D2C60-3AEA-1069-A2D7-08002B30309D} and set its data to 1
  • Close Regedit.exe

Hopes u like it............

find the last date and time when your PC was shutdown

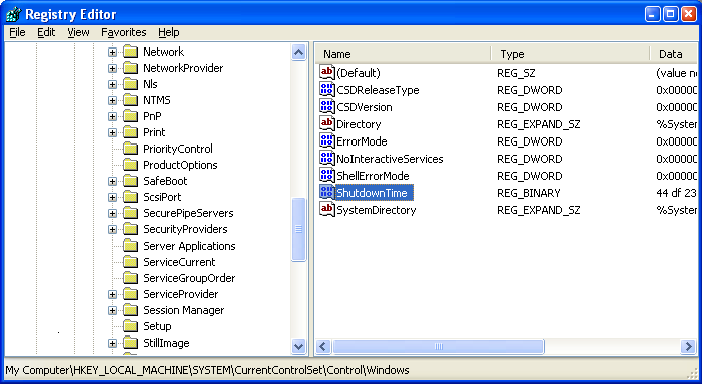
U might be wondering what is the need for this.But, this is very important in company's local or server systems.Every minute is precious to them.So, they keep a watch on how long their system is down for maintenance.Home users can also use this to know when their PC was last used (In case, u share your PC with roommates.)There are 2 ways to find this:

Method 1

Open the event viewer.This can be opened by start->run->eventvwr.msc or Alternatively by right clicking "My Computer Icon" than select "Manage"A window will open.The first entry is of event viewer.Open this by double clicking it & select system as shown.Now, look for event number 6006(the most recent one).Here, data & time is shown for last shutdown is given as shown in fig.

Method 2

open ur registry by start->run->regedit.Now goto this location

"HKEY_LOCAL_MACHINE\SYSTEM \CurrentControlSet\Control\Windows".After reaching here,select ShutdownTime option as shown & select file->export.save file with any name with .txt extension.Now,open that file,it will also show the time.

How do u like?Leave a comment.........


Stop 0x0000007E Error message after upgrading to Service pack 2 or 3

This problem is common to people who uses a processor other than an Intel processor.

Here are 2 methods to tackle this problem.

Method 1
Important This section, method, or task contains steps that tell you how to modify the registry. However, serious problems might occur if you modify the registry incorrectly. Therefore, make sure that you follow these steps carefully. For added protection, back up the registry before you modify it. Then, you can restore the registry if a problem occurs.

1.Restart your computer in safe mode.                                                                                                                                 2.Click Start, click Run, type regedit, and then click OK.                                                                                              3.Locate and then click the following registry key:

HKEY_LOCAL_MACHINE\SYSTEM\ControlSet001\Services\Intelppm

4.In the right pane, right-click the Start entry, and then click Modify.                                                                                 5.In the Value data box, type 4, and then click OK.                                                                                                       6.Quit Registry Editor.                                                                                                                                                 7.Restart your computer.

Method 2
To work around this issue, run the recovery console by using the Windows XP CD. Then, select the recovery option. To run the Recovery Console from the Windows XP startup disk or from the Windows XP CD, follow these steps:

1.Insert the Windows XP startup disk in the floppy disk drive. Or, insert the Windows XP CD in the CD drive. Then, restart the computer.
Note If you are prompted, click to select any options that are required to start the computer from the CD drive.                                                                                                                                                                            2.When the "Welcome to Setup" screen appears, press R to start the Recovery Console.                                                                                                                                                                              3.If you have a dual-boot computer or a multiple-boot computer, select the installation that you want to access from the Recovery Console.                                                                                                                                                        4.When you are prompted, type the administrator password. Note Press ENTER if the administrator password is blank.                                                                                                                                                                                 5.At the Recovery Console command prompt, type the following command and Press ENTER. disable intelppm.                                                                                                                                                                             6.To exit the Recovery Console and to restart the computer, type exit at the Recovery Console command prompt, and then press ENTER.

Source:support.microsoft.com

Chat through command prompt

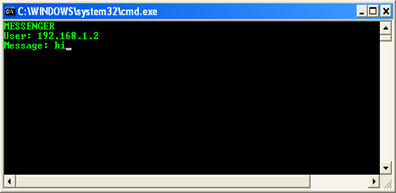
You have ofcourse heard about chatting through yahoo messenger ,google talk & various other protocol.But chatting through command prompt might be new to u.What u need is the IP Address of the person with whom u want to  chat.Thats it........In order to accomplish this u have fist create a .bat file(batch file)Now, lets start with it.Open your  Notepad and type:
@echo off
:A
Cls
echo MESSENGER
set /p n=User:
set /p m=Message:
net send %n% %m%
Pause
Goto A


Now save this as "Chat.bat". U can save it with any name u like.Doubleclick this .bat file and U will be presented with similar screen shown below:
MESSENGER
User:
After "User" type the IP address of your friend computer with whom you want to chat.

After this, you should see this:
Message:
Now type in the message you wish to send.Before you press "Enter" it should look like this:
image

Now all you need to do is press "Enter", and start chatting!

Disable content Advisor password in IE

Normally we don't use this feature but still those who use it, they might have faced this problem.We keep so many accounts that remembering password for each account becomes difficult.So,if u have forgotten this password we will tell u how to disable it.

start -->run-->regedit

Delete the 'Key icon' present in Rating folder which is stored at
HKEY_LOCAL_MACHINE\Software\Microsoft\Windows\CurrentVersion\Policies in the
registry and restart the system.

image

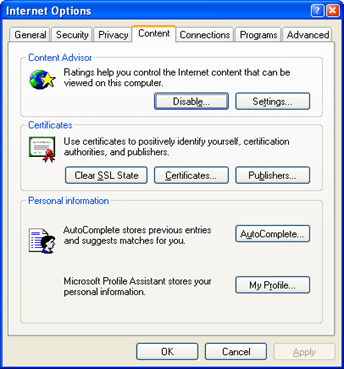
Restart the computer and run Internet Explorer again.Goto-->View(tab)-->Internet Options-->Content tab and if the (Enable/Disable) button still says Disable, click on it,if asked any password,click on OK.This will disable Content Advisor.Any suggestion on this topic or on some other topic is welcomed..

Recover Web / FTP / POP3 / Email passwords

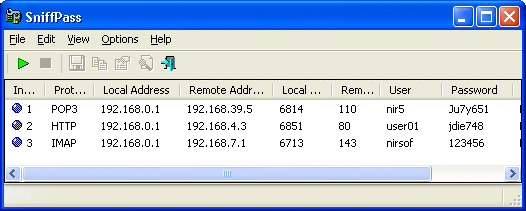
There occurs many times that we forget our password.It can recover lost Web/FTP/Email passwords.When ever we connect to any site which require authentication than when we login, our password is send through network adapter card like ethernet card etc....It can capture the passwords for these Protocols POP3, IMAP4, SMTP, FTP, and HTTP (basic authentication passwords).U might be thinking that how big it is and what is the price?Its a small tool & that too free.

 download

It works on Windows 98/ME/NT/2000/XP/2003/Vista with WinPcap capture driver installed.

How to use Sniffpass
  1. If you have Windows 9x, Windows NT, or Windows XP with SP1, you must download and install the WinPcap capture driver in order to use SniffPass.
    In all other versions of Windows (including Windows XP with SP2), installing this capture driver is optional. If you don't install this driver, you can still use the raw sockets method for capturing the passwords.
  2. Run the executable file of SniffPass (SniffPass.exe).
  3. From the File menu, select "Start Capture", or simply click the green play button in the toolbar. If it's the first time that you use SniffPass, you'll be asked to select the capture method and the network adapter that you want to use.
    After you select the desired capture options, SniffPass listen to your network adapter, and display instantly any password that it find.

Unable to delete a file:Access Denied

You might have faced this problem atleast one time(I am used to it).This problem occurs when u want delete certain file or directory which is being used by the system.There can be many more reasons for it.Some more common messages that pop-up are

"There has been a sharing violation.
The source or destination file may be in use.
The file is in use by another program or user.
Make sure the disk is not full or write-protected and that the file is not currently in use
."

One easy way is to delete that folder/file after u reboot.U can delete by booting into safe mode.But, if still u are  not allowed to delete it than there is another way to this.Unlocker is an application which has been developed to tackle this problem.Once U install it,than right click the folder u want to delete.

It will show which all application are using it.Just press Unlock all & you are done!

Download Unlocker

Remain anonymous & access blocked sites

There is a great tool which can allow u to hide your IP address which means anonymity and also allows u to access blocked websites from your office or college or even from home. Ultrasurf is a free tool having a size of 280kb or so...It is portable also.It works with Internet explorer(by default).But, its maker have provided support for firefox in terms of Add on.


U can download it from here .
for firefox Addon Download Just double click it & it will start working.Give it a try.........

Want to hide any Drive or partition

U might be tempted to this.There can be various reasons for this.May be u have something secret document that u don’t want your colleague(in office or at home) to know.What so ever be the reason Microsoft has provided a tool which can accomplish this.This tool is "diskpart".To hide any drive follow these steps:


Go to Start > run > type "diskpart".(Without Quote)a dos window will appear with following prompt.
DISKPART>


Then type "list volume" this will look like it


Diskpart


If u wanna hide drive S then type "select volume 3"then a message will appear in same window { Volume 3 is the selected volume}
Now type " remove letter E" now a message will come { Diskpart Removed the Drive letter }sometime it requires the reboot the computer .

Diskpart will remove the letter .Windows XP is not having capabilty to identify the unkown volume.
Don’t be afraid about the data, it will remain in the drive. To Come back to the Drive repeat the process . Repeat step which is shown in this post but this time do execute "remove letter E" command.Just replace " remove" with "assign".Now, execute this command " assign letter E".

Windows Commands A-Z

U can see many of the command here which will appear to be familiar.but,many of them u may not have heard.Some of the commonly used commands can be seen easily by typing help in command prompt.But, a whole list is presented here.

An A-Z Index of the Windows XP command line
ADDUSERS Add or list users to/from a CSV file
ARP Address Resolution Protocol
ASSOC Change file extension associations
ASSOCIAT One step file association
AT Schedule a command to run at a later time
ATTRIB Change file attributes

BOOTCFG Edit Windows boot settings
BROWSTAT Get domain, browser and PDC info

CACLS Change file permissions
CALL Call one batch program from another
CD Change Directory - move to a specific Folder
CHANGE Change Terminal Server Session properties
CHKDSK Check Disk - check and repair disk problems
CHKNTFS Check the NTFS file system
CHOICE Accept keyboard input to a batch file
CIPHER Encrypt or Decrypt files/folders
CleanMgr Automated cleanup of Temp files, recycle bin
CLEARMEM Clear memory leaks
CLIP Copy STDIN to the Windows clipboard.
CLS Clear the screen
CLUSTER Windows Clustering
CMD Start a new CMD shell
COLOR Change colors of the CMD window
COMP Compare the contents of two files or sets of files
COMPACT Compress files or folders on an NTFS partition
COMPRESS Compress individual files on an NTFS partition
CON2PRT Connect or disconnect a Printer
CONVERT Convert a FAT drive to NTFS.
COPY Copy one or more files to another location
CSCcmd Client-side caching (Offline Files)
CSVDE Import or Export Active Directory data

DATE Display or set the date
Dcomcnfg DCOM Configuration Utility
DEFRAG Defragment hard drive
DEL Delete one or more files
DELPROF Delete NT user profiles
DELTREE Delete a folder and all subfolders
DevCon Device Manager Command Line Utility
DIR Display a list of files and folders
DIRUSE Display disk usage
DISKCOMP Compare the contents of two floppy disks
DISKCOPY Copy the contents of one floppy disk to another
DNSSTAT DNS Statistics
DOSKEY Edit command line, recall commands, and create macros
DSADD Add user (computer, group..) to active directory
DSQUERY List items in active directory
DSMOD Modify user (computer, group..) in active directory

ECHO Display message on screen
ENDLOCAL End localisation of environment changes in a batch file
ERASE Delete one or more files
EXIT Quit the current script/routine and set an errorlevel.
EXPAND Uncompress files
EXTRACT Uncompress CAB files

FC Compare two files
FDISK Disk Format and partition
FIND Search for a text string in a file
FINDSTR Search for strings in files
FOR /F Loop command: against a set of files
FOR /F Loop command: against the results of another command
FOR Loop command: all options Files, Directory, List
FORFILES Batch process multiple files
FORMAT Format a disk
FREEDISK Check free disk space (in bytes)
FSUTIL File and Volume utilities
FTP File Transfer Protocol
FTYPE Display or modify file types used in file extension associations

GLOBAL Display membership of global groups
GOTO Direct a batch program to jump to a labelled line

HELP Online Help
HFNETCHK Network Security Hotfix Checker

IF Conditionally perform a command
IFMEMBER Is the current user in an NT Workgroup
IPCONFIG Configure IP

KILL Remove a program from memory

LABEL Edit a disk label
LOCAL Display membership of local groups
LOGEVENT Write text to the NT event viewer.
LOGOFF Log a user off
LOGTIME Log the date and time in a file

MAPISEND Send email from the command line
MEM Display memory usage
MD Create new folders
MKLINK Create a symbolic link (linkd)
MODE Configure a system device
MORE Display output, one screen at a time
MOUNTVOL Manage a volume mount point
MOVE Move files from one folder to another
MOVEUSER Move a user from one domain to another
MSG Send a message
MSIEXEC Microsoft Windows Installer
MSINFO Windows NT diagnostics
MSTSC Terminal Server Connection (Remote Desktop Protocol)
MUNGE Find and Replace text within file(s)
MV Copy in-use files

NET
Manage network resources
NETDOM Domain Manager
NETSH Configure network protocols
NETSVC Command-line Service Controller
NBTSTAT Display networking statistics (NetBIOS over TCP/IP)
NETSTAT Display networking statistics (TCP/IP)
NOW Display the current Date and Time
NSLOOKUP Name server lookup
NTBACKUP Backup folders to tape
NTRIGHTS Edit user account rights

PATH Display or set a search path for executable files
PATHPING Trace route plus network latency and packet loss
PAUSE Suspend processing of a batch file and display a message
PERMS Show permissions for a user
PERFMON Performance Monitor
PING Test a network connection
POPD Restore the previous value of the current directory saved by PUSHD
PORTQRY Display the status of ports and services
PRINT Print a text file
PRNCNFG Display, configure or rename a printer
PRNMNGR Add, delete, list printers set the default printer
PROMPT Change the command prompt
PsExec Execute process remotely
PsFile Show files opened remotely
PsGetSid Display the SID of a computer or a user
PsInfo List information about a system
PsKill Kill processes by name or process ID
PsList List detailed information about processes
PsLoggedOn Who's logged on (locally or via resource sharing)
PsLogList Event log records
PsPasswd Change account password
PsService View and control services
PsShutdown Shutdown or reboot a computer
PsSuspend Suspend processes
PUSHD Save and then change the current directory

QGREP Search file(s) for lines that match a given pattern.

RASDIAL Manage RAS connections
RASPHONE Manage RAS connections
RECOVER Recover a damaged file from a defective disk.
REG Registry: Read, Set, Export, Delete keys and values
REGEDIT Import or export registry settings
REGSVR32 Register or unregister a DLL
REGINI Change Registry Permissions
REM Record comments (remarks) in a batch file
REN Rename a file or files.
REPLACE Replace or update one file with another
RD Delete folder(s)
RDISK Create a Recovery Disk
RMTSHARE Share a folder or a printer
ROBOCOPY Robust File and Folder Copy
ROUTE Manipulate network routing tables
RUNAS Execute a program under a different user account
RUNDLL32 Run a DLL command (add/remove print connections)

SC Service Control
SCHTASKS Create or Edit Scheduled Tasks
SCLIST Display NT Services
ScriptIt Control GUI applications
SET Display, set, or remove environment variables
SETLOCAL Control the visibility of environment variables
SETX Set environment variables permanently
SHARE List or edit a file share or print share
SHIFT Shift the position of replaceable parameters in a batch file
SHORTCUT Create a windows shortcut (.LNK file)
SHOWGRPS List the NT Workgroups a user has joined
SHOWMBRS List the Users who are members of a Workgroup
SHUTDOWN Shutdown the computer
SLEEP Wait for x seconds
SOON Schedule a command to run in the near future
SORT Sort input
START Start a program or command in a separate window.
SU Switch User
SUBINACL Edit file and folder Permissions, Ownership and Domain
SUBST Associate a path with a drive letter
SYSTEMINFO List system configuration

TASKLIST List running applications and services
TIME Display or set the system time
TIMEOUT Delay processing of a batch file
TITLE Set the window title for a CMD.EXE session
TOUCH Change file timestamps
TRACERT Trace route to a remote host
TREE Graphical display of folder structure
TYPE Display the contents of a text file

USRSTAT List domain usernames and last login

VER Display version information
VERIFY Verify that files have been saved
VOL Display a disk label

WHERE Locate and display files in a directory tree
WHOAMI Output the current UserName and domain
WINDIFF Compare the contents of two files or sets of files
WINMSD Windows system diagnostics
WINMSDP Windows system diagnostics II
WMIC WMI Commands

XCACLS Change file permissions
XCOPY Copy files and folders

Remove New Folder.exe

This is a annoying worm.What it does is, it creates a copy of itself & use the icon of folder.When somebody clicks on it , it becomes active.It also changes its name.It takes the name of the folder in which it is saved.It can be identified easily.U just select that folder by clicking just one time on it & than look at the information provided by the system.System will show file type as application.Now, u know that it is this worm.

How to remove it:
Download any one of the following tool to remove new folder.exe virus
( run tools In safe mode )

Tool 1
Tool 2

If the above tools are unable to remove it than u can remove it manually.Follow these steps.
Delete File named svichossst.exe

[HKEY_CURRENT_USER\Software\Microsoft\Windows\CurrentVersion\Policies\System]
“@”=[HKEY_CURRENT_USER\Software\Microsoft\Windows\CurrentVersion\Run]
“Yahoo Messengger”=

[HKEY_LOCAL_MACHINE\SOFTWARE\Microsoft\Windows NT\CurrentVersion\Winlogon]
“Shell”=”Explorer.exe “

Remove heap41a

This doesn't harm any thing but still it is better to remove it.Here are two ways to remove it.

First solution
Press CTRL+ALT+DEL to open Windows task Manager.
Go to the processes tab and look for svchost.exe under the “image name”. There will be many but look for the ones which have your username under the “username”.
Press DEL to kill these files. It will give you a warning, simply press Yes
Repeat for other svchost.exe files with your username. Note: Do not kill svchost.exe under system, local service or network service.
Type C:\heap41a in Start Menu > run.. and press enter. You need to do this because it is a hidden folder.
Delete all files inside this folder.
Again go to Start Menu > Run and type in Regedit
Go to the menu Edit > Find
Type “heap41a” here and press enter. You will get something like this “[winlogon] C:\heap41a\svchost.exe C:\heap(some number)\std.txt”
Select that and Press DEL. It will ask “Are you sure you wanna delete this value”, click Yes
Now close the registry editor and you are done.
Make sure to delete the autorun.inf file and any unrecognized file ends with .exe in your pen drive otherwise it will replicate itself again.

Second solution
Download this file, unzip it, run the program and press the remove button. Done!

Hope it helps u

Openinig drives with 'open with'

Hi,
This is a virus problem.This can be removed with updated anti-virus.still,if u r not able to remove it.Here is an alternate way.
open "cmd"
Type following commands.

cd \
attrib -h
attrib --h -s aut*.inf
start . //this command open the c drive delete autorun.inf file.

follow this in all drives.
open task manager and kill "Explorer.exe" process then from file menu of taksmanager run new task "explorer.exe"

Now u r able to open all drive with out 'open with'

remove autorun.inf

There is a Trojan/virus (either the Win32/Pacex virus or the Win32/PSW.Agent.NDP trojan) that uses those two files. Here is how you can get rid of them:

1) Open up Task Manager (Ctrl-Alt-Del)
2) If wscript.exe is running, end it.
3) If explorer.exe is running, end it.
4) Open up “File | New Task (Run)” in the Task manager
5) Run cmd
6) Run the following command del #:’autorun.* /f/a/s/q with other drives in turn

where # is replaced by drive name e.g-c,d,e etc

Be careful with this command it can delete your all data one by one from your hdd if execute wrongly so place your mouse on x position of cmd prompt windows and if it starts deleting your files close it

or we can do this step by without ending explorer.exe

just hit windows+R it will show you run dialog box now type cmd there,it will give you command prompt

now navigate to #:’ where # replaced with your different drive name

i am taking the example of c:’ drive

now write c:’del/a/s/q/f and give a space now press tab until you see autorun.inf press enter

now yo done do the rest steps as i said (be careful see clearly autorun.inf before deleting it and don’t delete any ntdelect there it may crash your system)

7) Go to your Windows’System32 directory by typing cd c:’windows’system32
8 ) Type dir /a amv*.*
9) If you see any files names amv0.dll or amvo.exe or amv0.exe, use the following commands to delete each of them:

attrib -r -s -h amvo.exe
del amvo.exe

10) Use the Task Manager’s Run command to fire up regedit
11) Navigate to HKEY_CURRENT_USER ’ SOFTWARE ’ Microsoft ’ Windows ’ CurrentVersion ’ Run (as usual, take a backup of your registry before touching it!)
12) If there are any entries for avpo.exe, delete them.
13) Do a complete search of your registry for ntde1ect.com and delete any entries you find.
14) Restart your computer.

SOURCE:www.thehackerslibrary.com

msinfo.exe Highly dangerous

Hi :-),

While surfing the net I found that many people are paranoid of msinfo.exe & no clear information is available about how to solve this problem.Th e beat & free way to clean this infection is to use spybot Search & Destroy.Update this anti-spyware & make sure that this application has 2004-10-26 update installed.This file has the solution to this problem.

More Info:http://www.safer-networking.org/en/updatehistory/2004-10-26.html.

Hosted by Safer-Networking


Download from our server
Safer-Networking Ltd. #1
Download from our server
Safer-Networking Ltd. #2
Download from our server
Safer-Networking Ltd. #3


If u like the content helpful,pls leave a comment.Thanks

Folder option gone

This problem can be caused by some viruses or when administrator applies certain policies on the system.in both the case,user of the system suffers.Now, no more suffering.Here is the solution to your problem


METHOD 1 :

Here’s how you can get Folder Options back..
1: Open Start->Run
2: type gpedit.msc and hit enter
3: now in the Group Policy window, from the left pane, select user configuration->Administrative Tempelates->windows components->Windows Explorer by highlighting it with the mouse cursor..
4: now in the right side you will see an option which says "Removes the Folder Options menu item from the Tools menu"
5: right click on this option and select properties
6: now in the properties under Setting tab, select Disabled and hit OK


METHOD 2 :

Open the registry and find the key [HKEY_CURRENT_USER’Software’Microsoft’Windows’CurrentVersion’Policies’Explorer]

Create a new DWORD value,or modify the existing value named "NoFolderOptions" and set it to equal "1" to hide the options or "0" to show the options.

Log-off or restart Windows for the changes to take effect.

If u still the face the problem,post it here.I will provide a more detailed solution.Thanks! Hope u like it.

Create Hidden account in Windows

This tweak allows an account that is normally displayed on the Welcome screen to be hidden from view. To log on using the account it’s necessary to use the Log On To Windows dialog box similar to the one in Windows 2000.


Before attempting this, a general rule of thumb is to back up your registry.This can be done by exporting the registry to some safe place.

1)Start->Run->Regedit
2)Search this Registry Key: HKEY_LOCAL_MACHINE’SOFTWARE’Microsoft’WindowsNT’CurrentVersion’Winlogon’SpecialAccounts’UserList
3)Modify/Create the Value Data Type(s) and Value Name(s) as detailed below.
Data Type: REG_DWORD [Dword Value] // Value Name: Type Name of Account to be Hidden
Setting for Value Data: [0 = Account is Hidden / 1 = Enabled]
4)Exit Registry and Reboot...

While the account is hidden on the Welcome screen, note that the account profile will be visible in C:’Documents and Settings or wherever user profiles are stored as well as in Local Users and Groups. If u like the content,pls leave a comment/ spread a word about this blog.

Disable windows error reporting notification

Windows OS generally have a number of errors.Some are critical also.But,it frustrates its user with frequent messages.The best way to disable the notification is to follow these steps:

press "windows+pause/break" button together.Than go to Advanced tab & from there, look at the bottom.U will find that a button that says error reporting.click on it.It will present a small box.Select Disable error reporting & press OK or enter.

Now,U will not get such messages.

Remove Exploit.HTML.Iframe.FileDownload malware

Details of the selected infection are shown below. This infection can be detected and cleaned using Spy Soap.

Threat Exploit.HTML.Iframe.FileDownload detail information:

Spyware Name: Exploit.HTML.Iframe.FileDownload

Type: Exploit

Brief: Malware

Removal instructions: This infection can be removed using Spy Soap.

Minimum System Requirements
 Windows 98/Me, Windows 2000, XP,Vista
 350 Mhz processor
 15 MB hard drive space
 256 MB RAM 


Recover data from any device

Hi,In my previous post I mentioned the softwares which can recover data from your PC.But, it is not the only place where we keep our data.We sometimes keep in pen drive, memory card etc.This site provides tools for recoverig data from various devices.Theses are not free.Remember it!!


Memory card data recovery software Memory card data recovery software


Pen drive data recovery software Pen drive data recovery software


Digital camera data recovery software Digital camera data recovery software


Removable media data recovery software Removable media data recovery software


Digital pictures recovery software Digital pictures recovery software


Windows data recovery software Windows data recovery software


NTFS data recovery software NTFS data recovery software


FAT data recovery software FAT data recovery software


Sim card data recovery software Sim card data recovery software


Zune music recovery software Zune music recovery software


iPod data recovery software iPod data recovery software